AUTOMATED IR NERF TURRET MECHA 20
by: Ben Elkayam, Ermias Yemane, Roey Mevorach
Introduction
This projects goal was to design, construct and program a automated nerf turret that is capable of shooting a person 16 feet awya using an IR camera for signal detection. The firing conditions for this turret are a predetermined set of "dueling rules" specified in the following steps:
- The turret must start facing away from the intended target
- The turret will then roate 180 degrees to face the general area of the intended target
- The intended target will have 5 seconds to move around. by this point your turret is allowed to fire.
- After 5 seconds from the start of the duel the intended target must stand still for atleast 10 seconds.
- The turret can fire any amount of shot sduring either step 3 or 4. The scoring is based on if the opposing targets turret hit first, how many shots hit, and how many shots missed.
The turret is intended to be used exclusivley for the ME 405 Learn by Dueling Competition by the students who designed and programmed it and another other ME 405 students who wanted to try using the turret.
Turret Design
Hardware Design
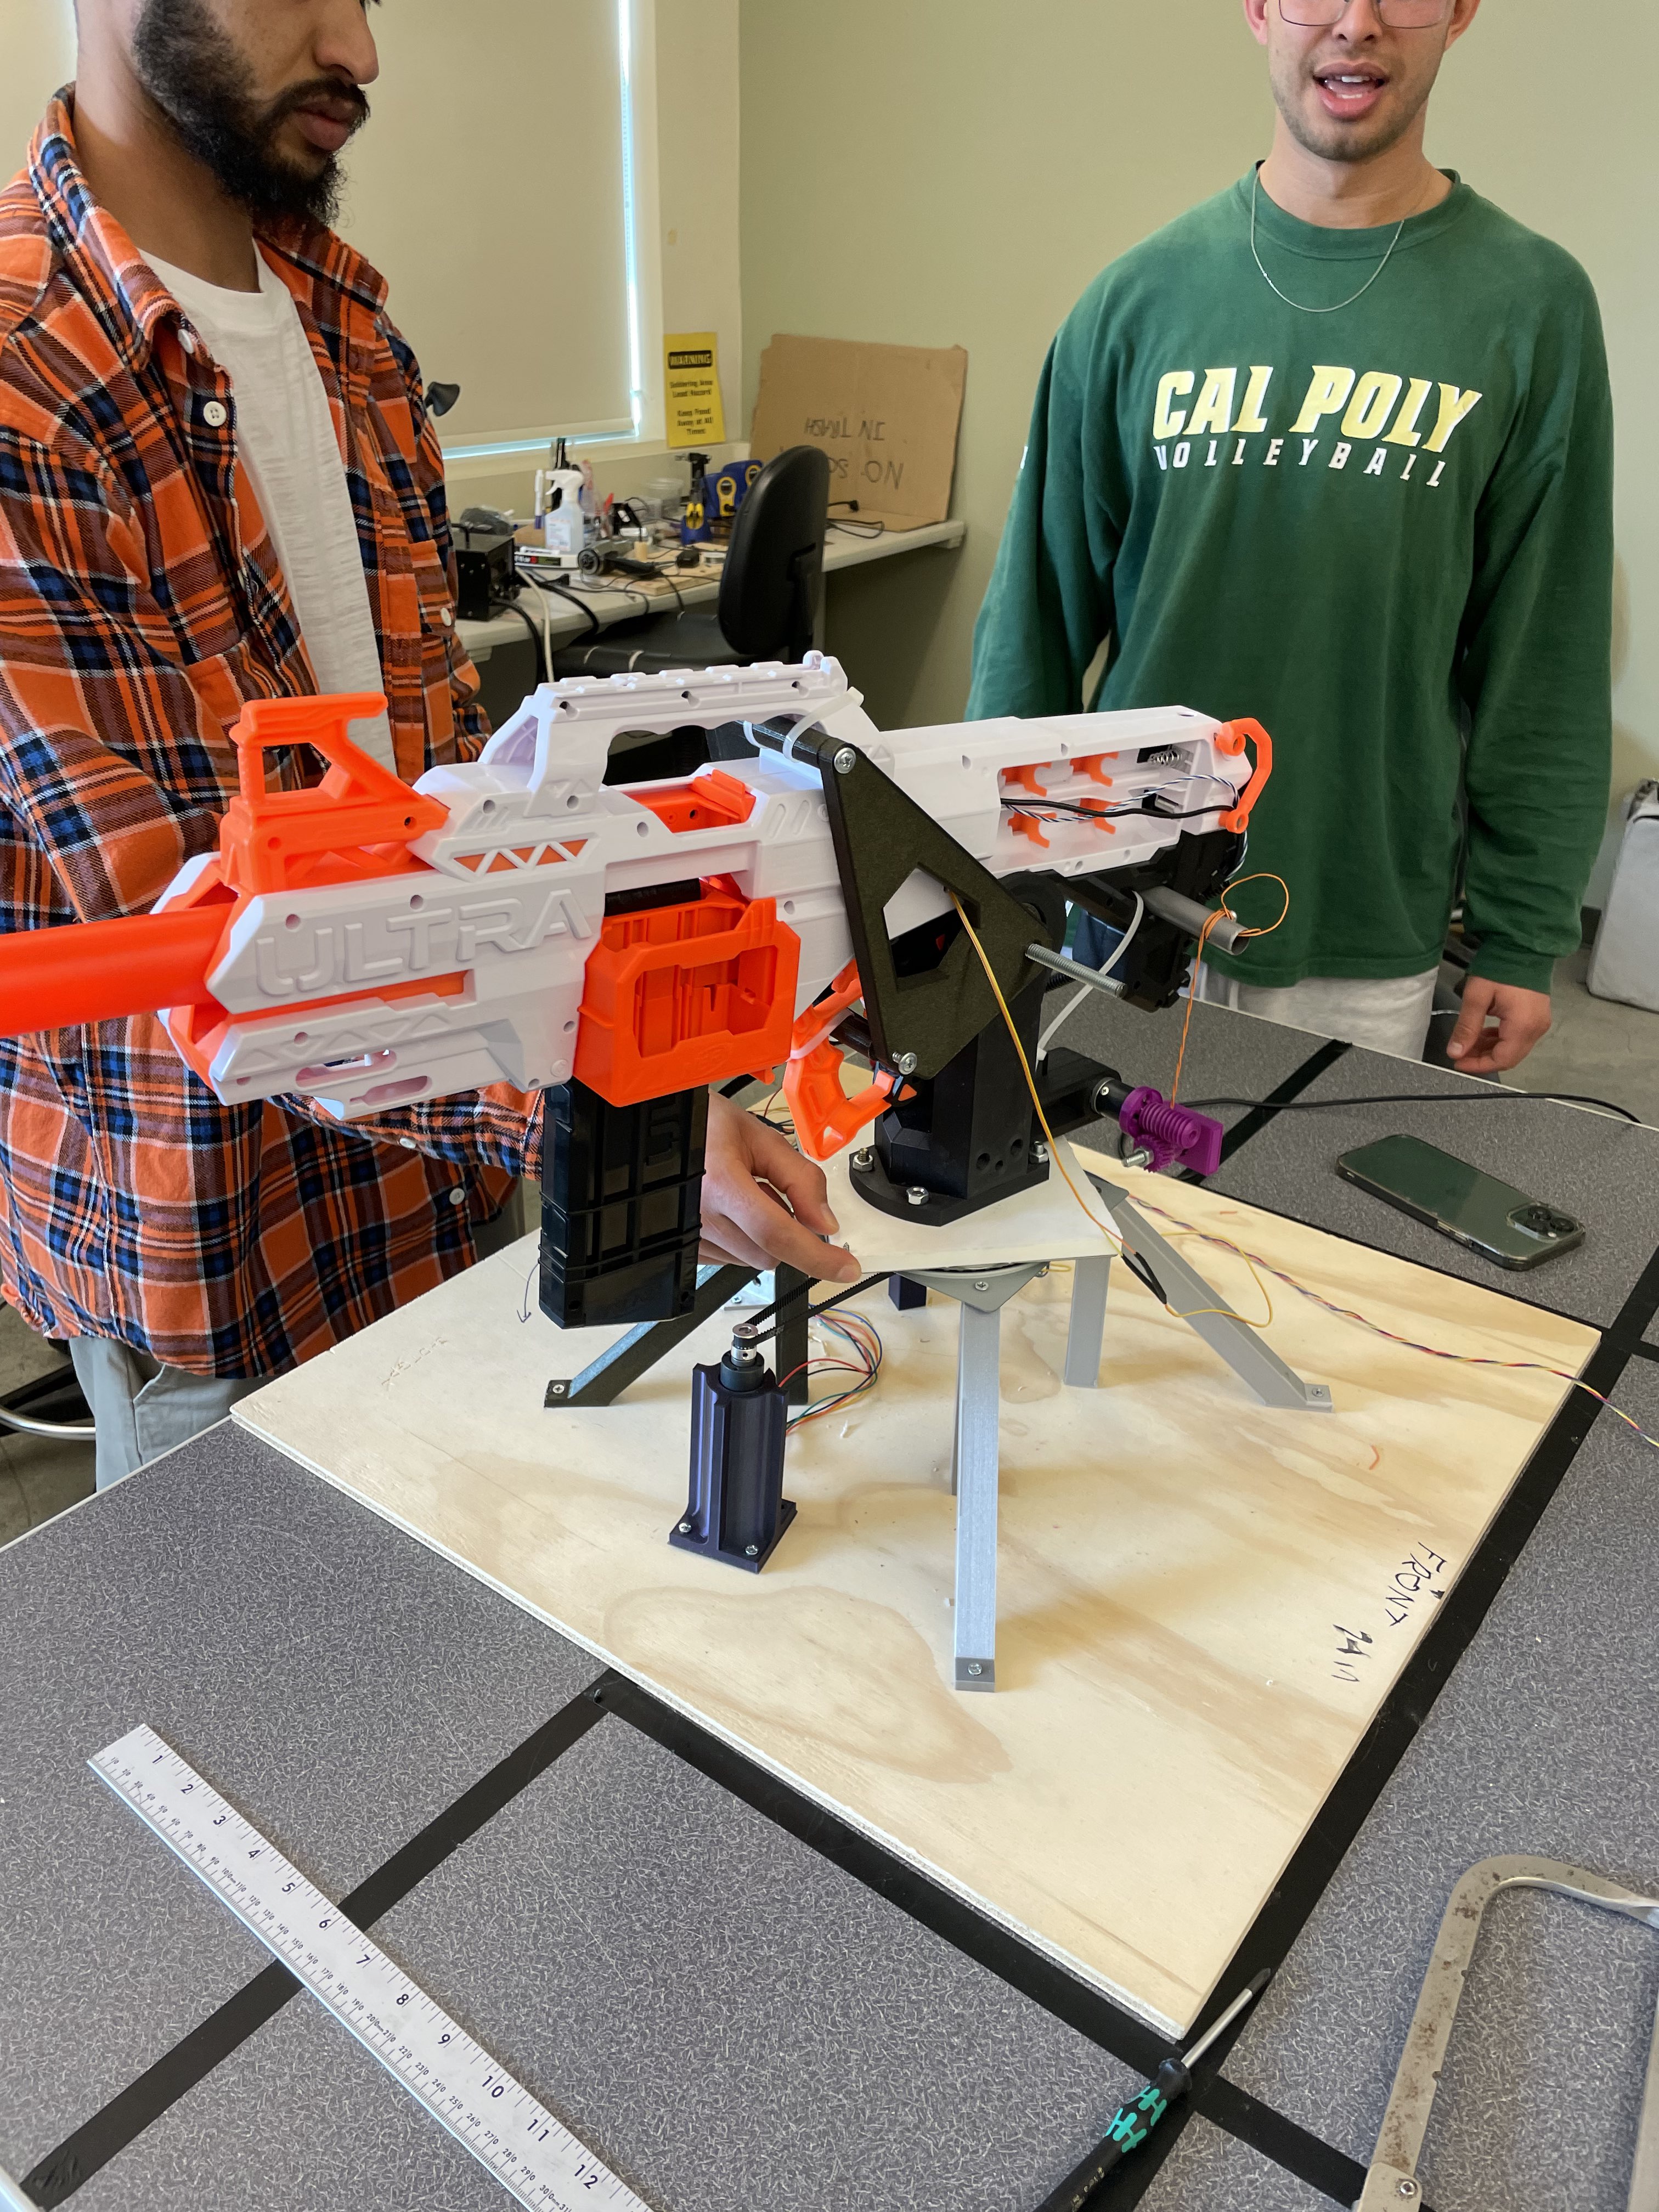
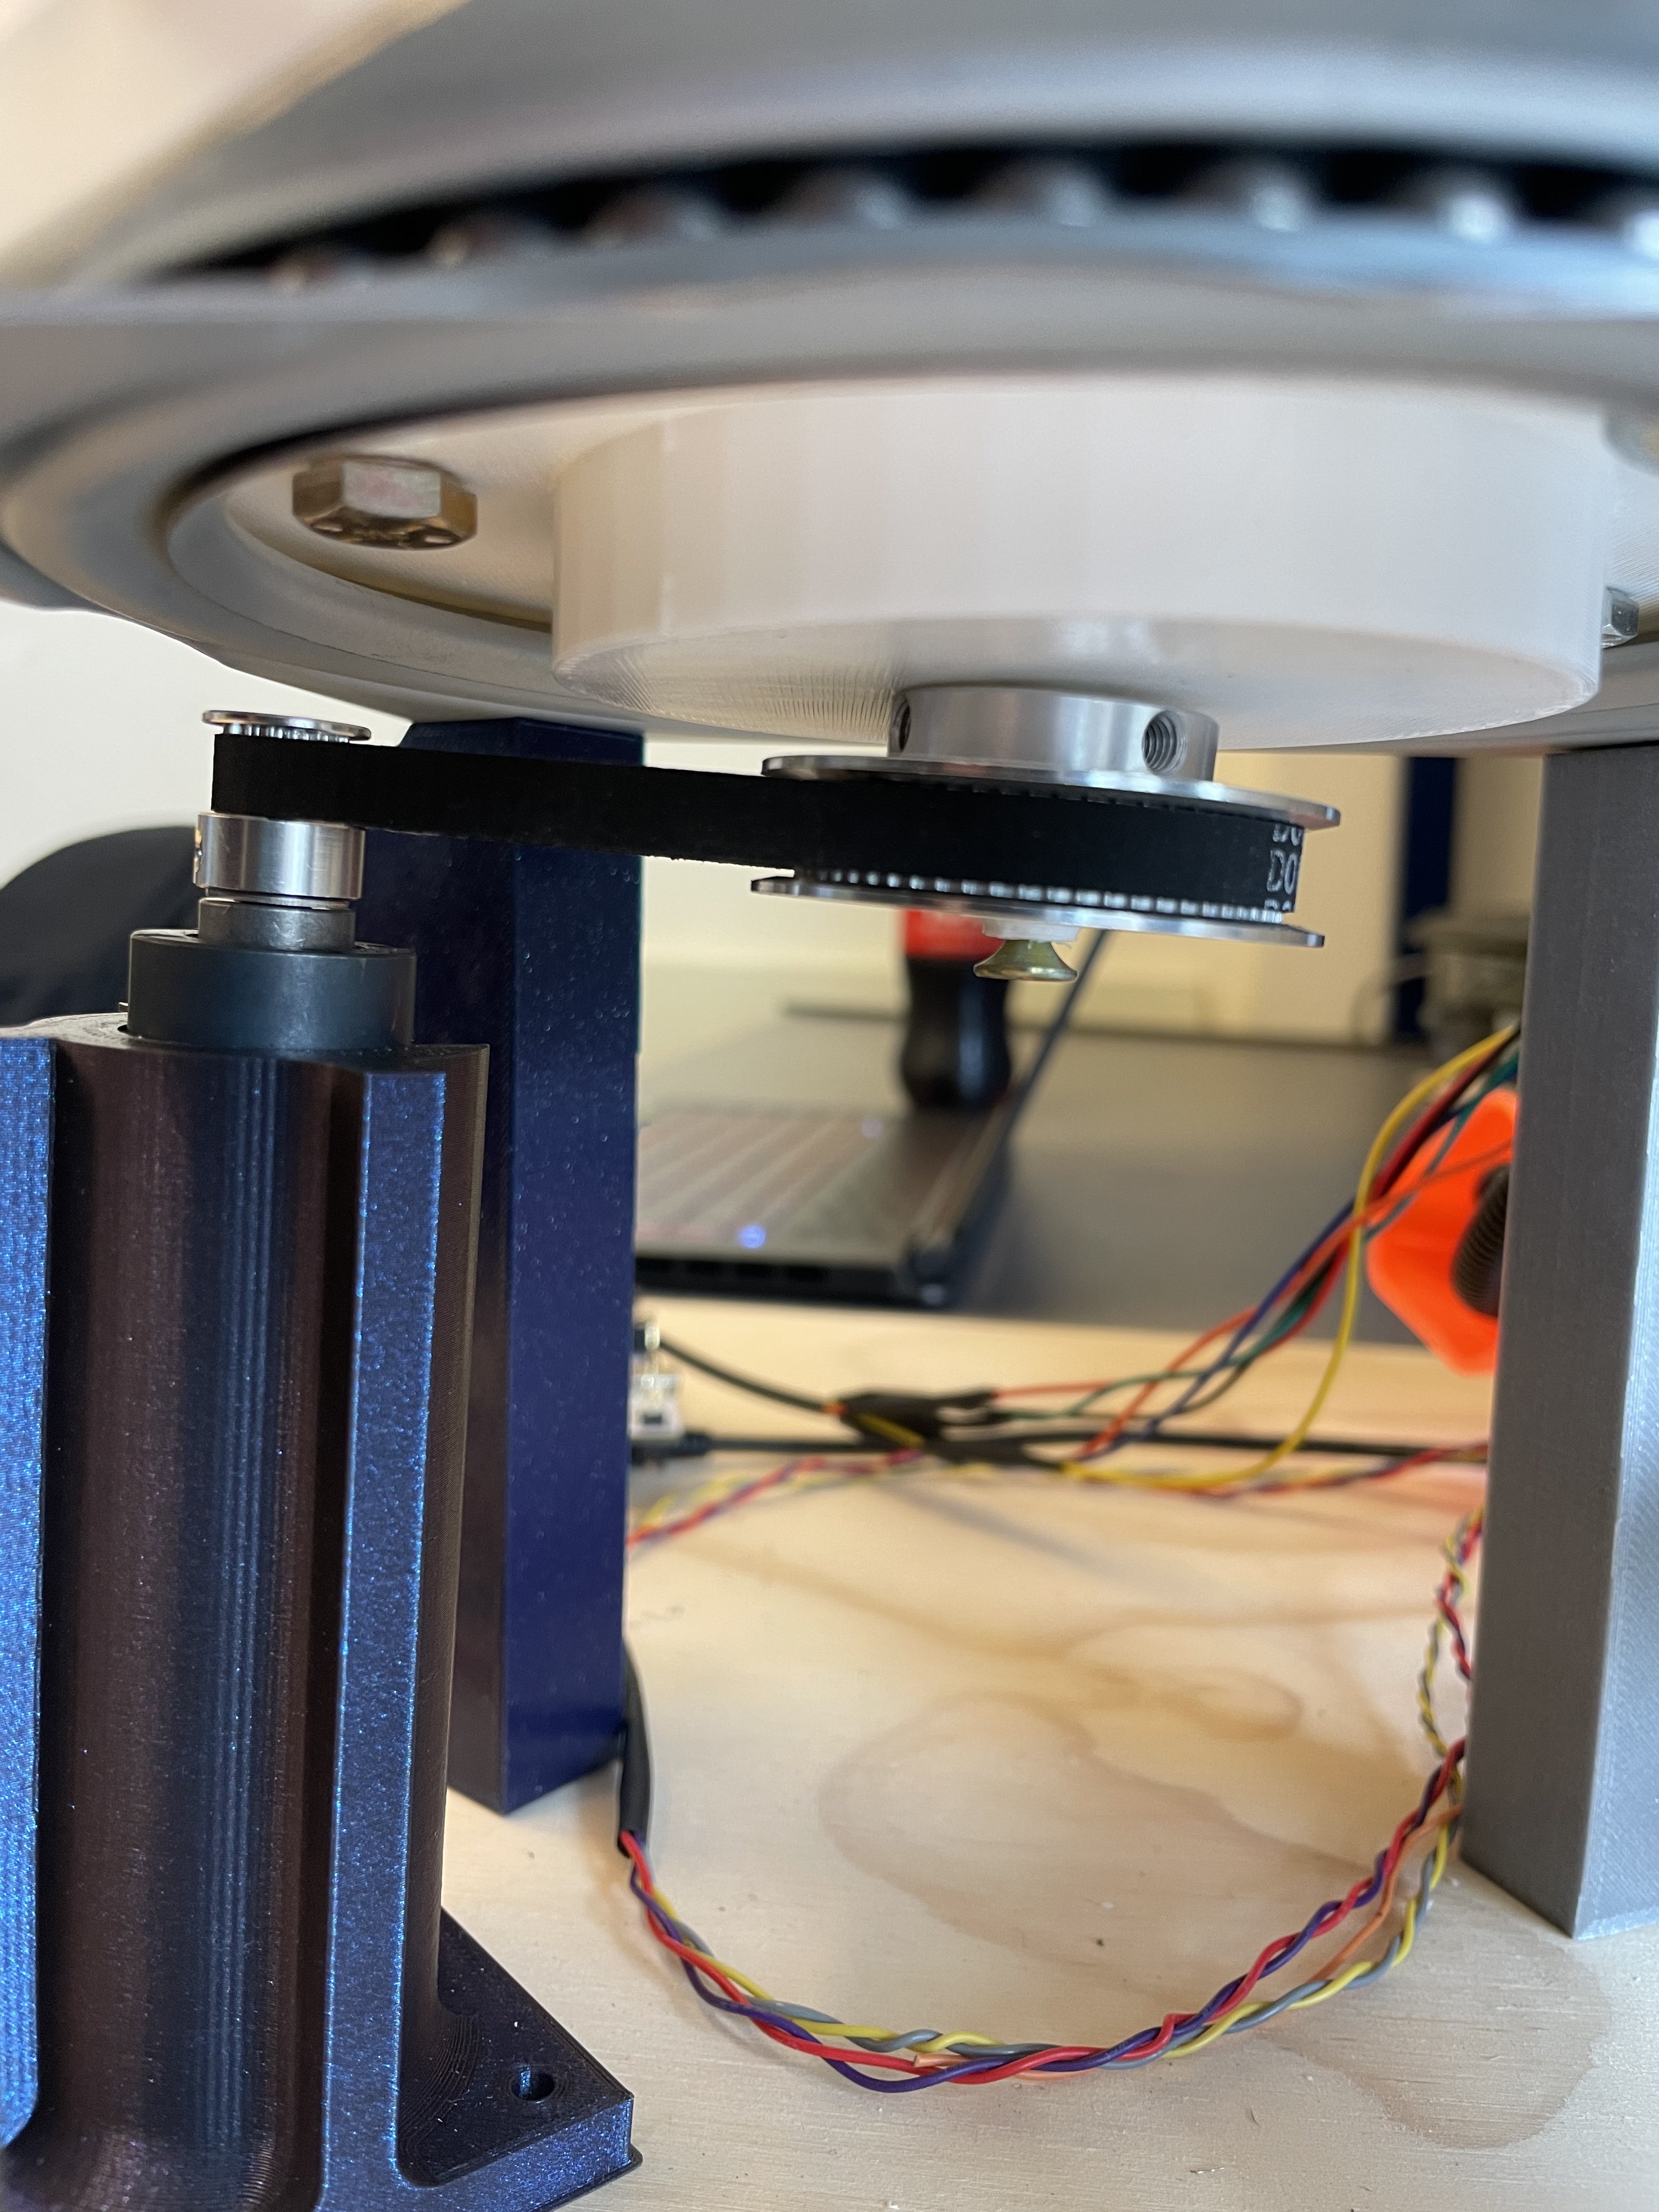
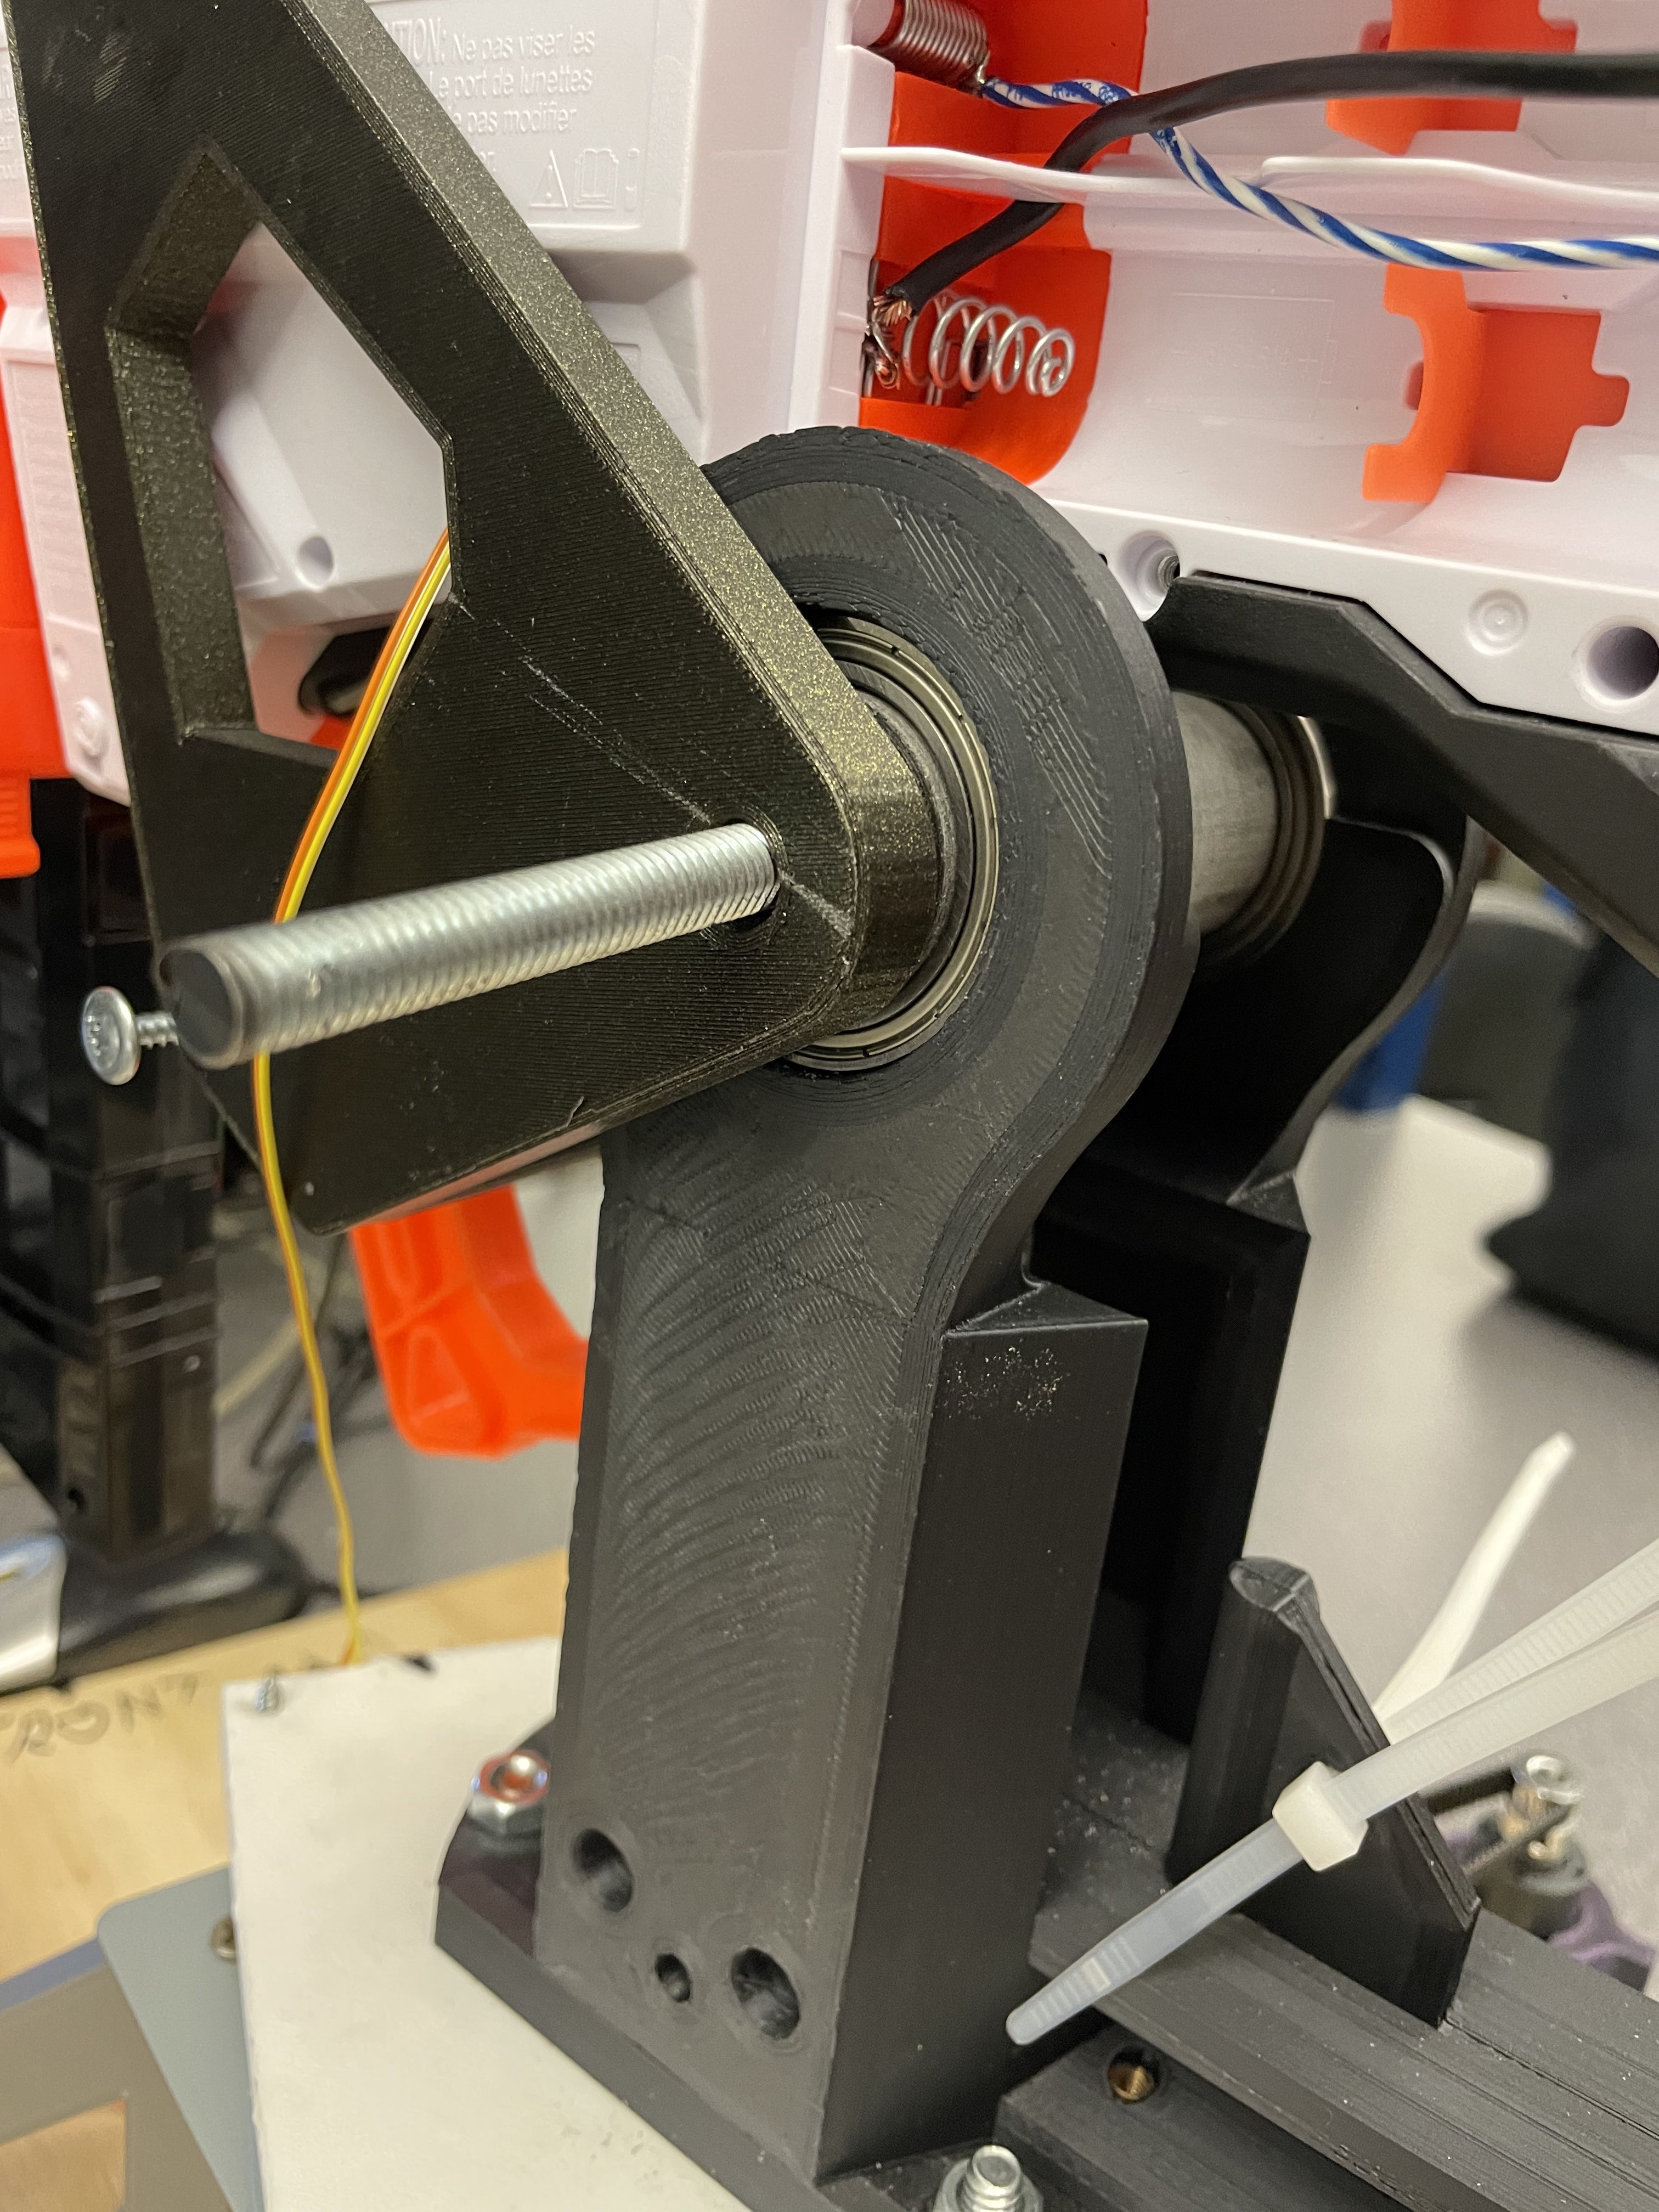
Our hardware design philisophy is based almost entirley around being compatible with the NERF gun we chose. For our turret we chose the NERF Ultra Select 2. An electronic firing mechanism and flywheel firing system where desirable as it made actuating the gun a pre-packaged operation. The only difficulty was the size of the gun made it difficult to design a fixture for. The design is outlined in our CAD folder. The 3 important design attributes of our final turret design are the yaw axis, the pitch axis, and the fixture. The yaw axis is composed of a lazy susan that sits on 4 legs conencting to the bottom half, and a pivot with a shaft coming through the middle of bearing downards which sits on the top. The yaw axis is driven by the 405 kot motors through a 400mm belt and a 3.75:1 torque pulley ratio. The pivot which composes the pitch axis as was designed around a set of 30mm bearing found within the ME 405 lab. The pivot piece which the large black 3D printed object, was printed with the assistance and guidance of Thomas Mcklay Taylor, another ME 405 student. The pitch axis is driven by a worm gear to spline gear system with an approximate gear ratio of 11:1 as to not be easily backdrivable. This drives a winch system that raises and lowers the gun. The pivot is attached to the final component set which is known as the gun clamp. This is a two piece mechanism which both acts as the shaft for which the gun pivots around and the mechanism which keeps the gun secured to the turret. Photos of the general design are provided below:
General View:
Yaw Axis:
Pitch Axis:

Gun Pivot:
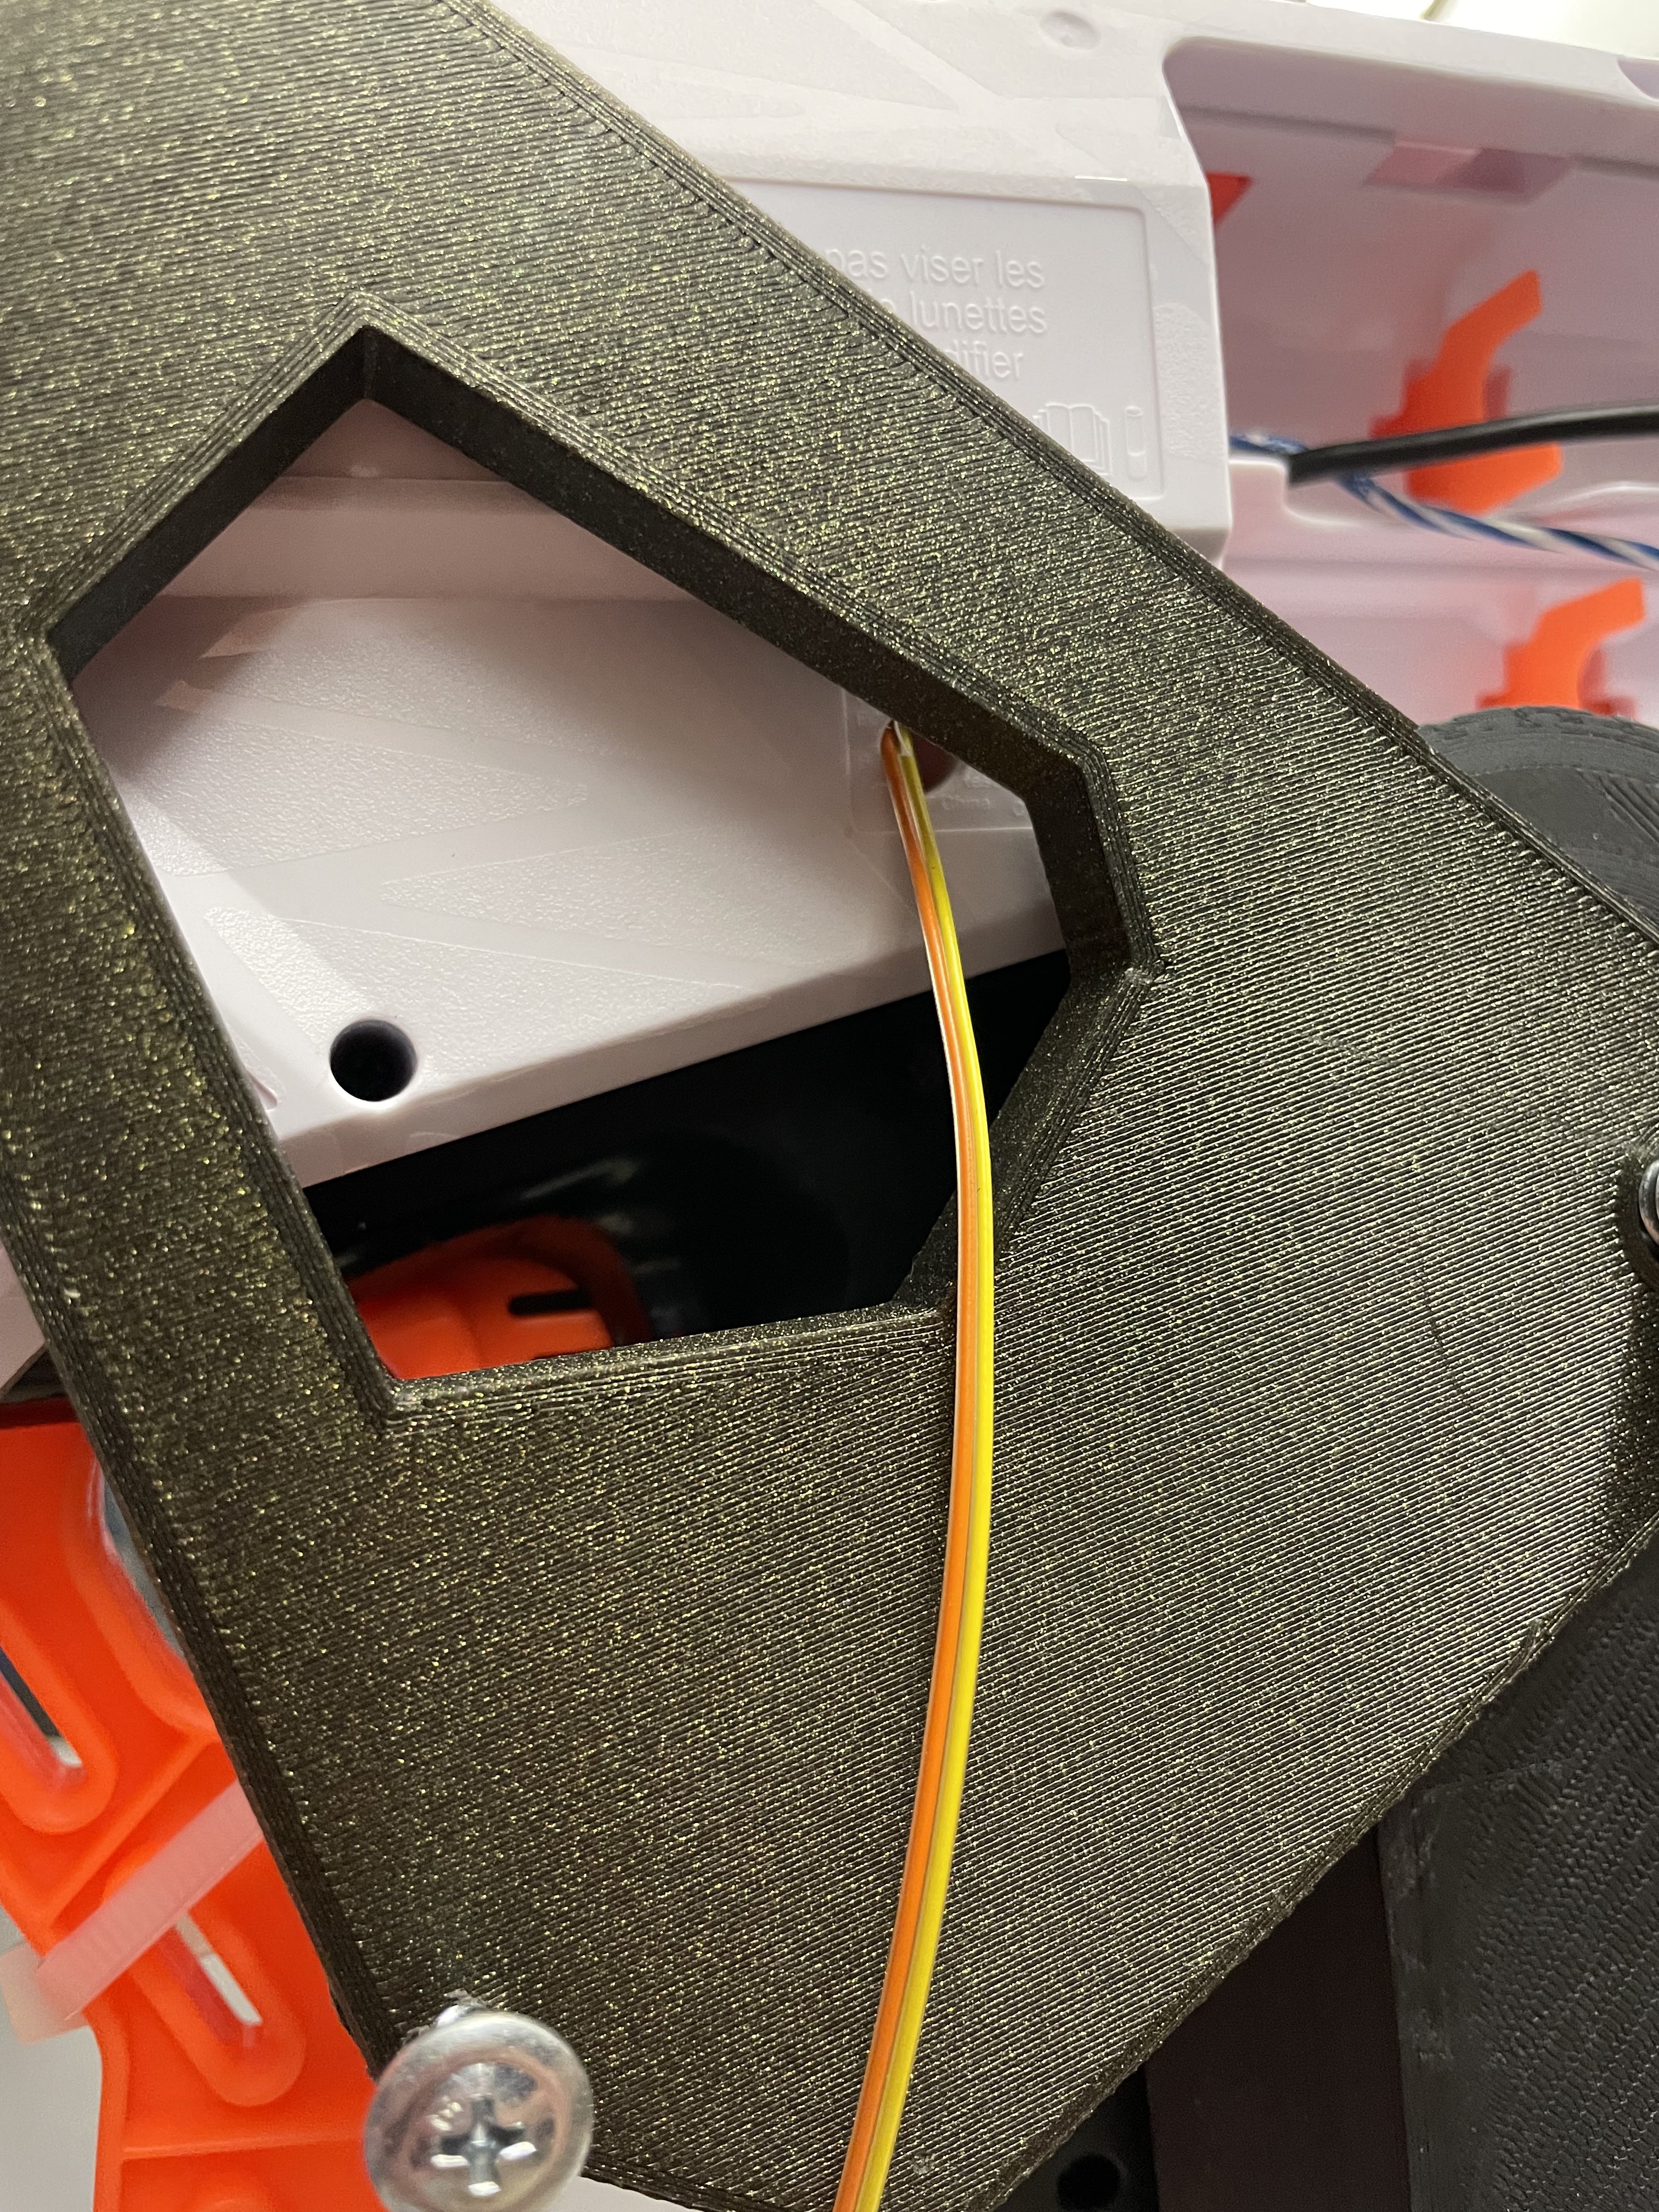
Firing Access Modification:
Electronic Design
In terms of electronic design, the modifications made to the gun is directly replacing the firing signal from a button within the NERF gun with a set of wires to allow external control of the firing mechanism. The second change was to soder longer power cables to the battery touchpoints in order to have the turret be able to be connected to the power supplies. A secondary part of our electronic design is that we ziptied the flywheel trigger down rather than seek a direct electrical control solution because we realized we would always want the flywheels on.
Software Design
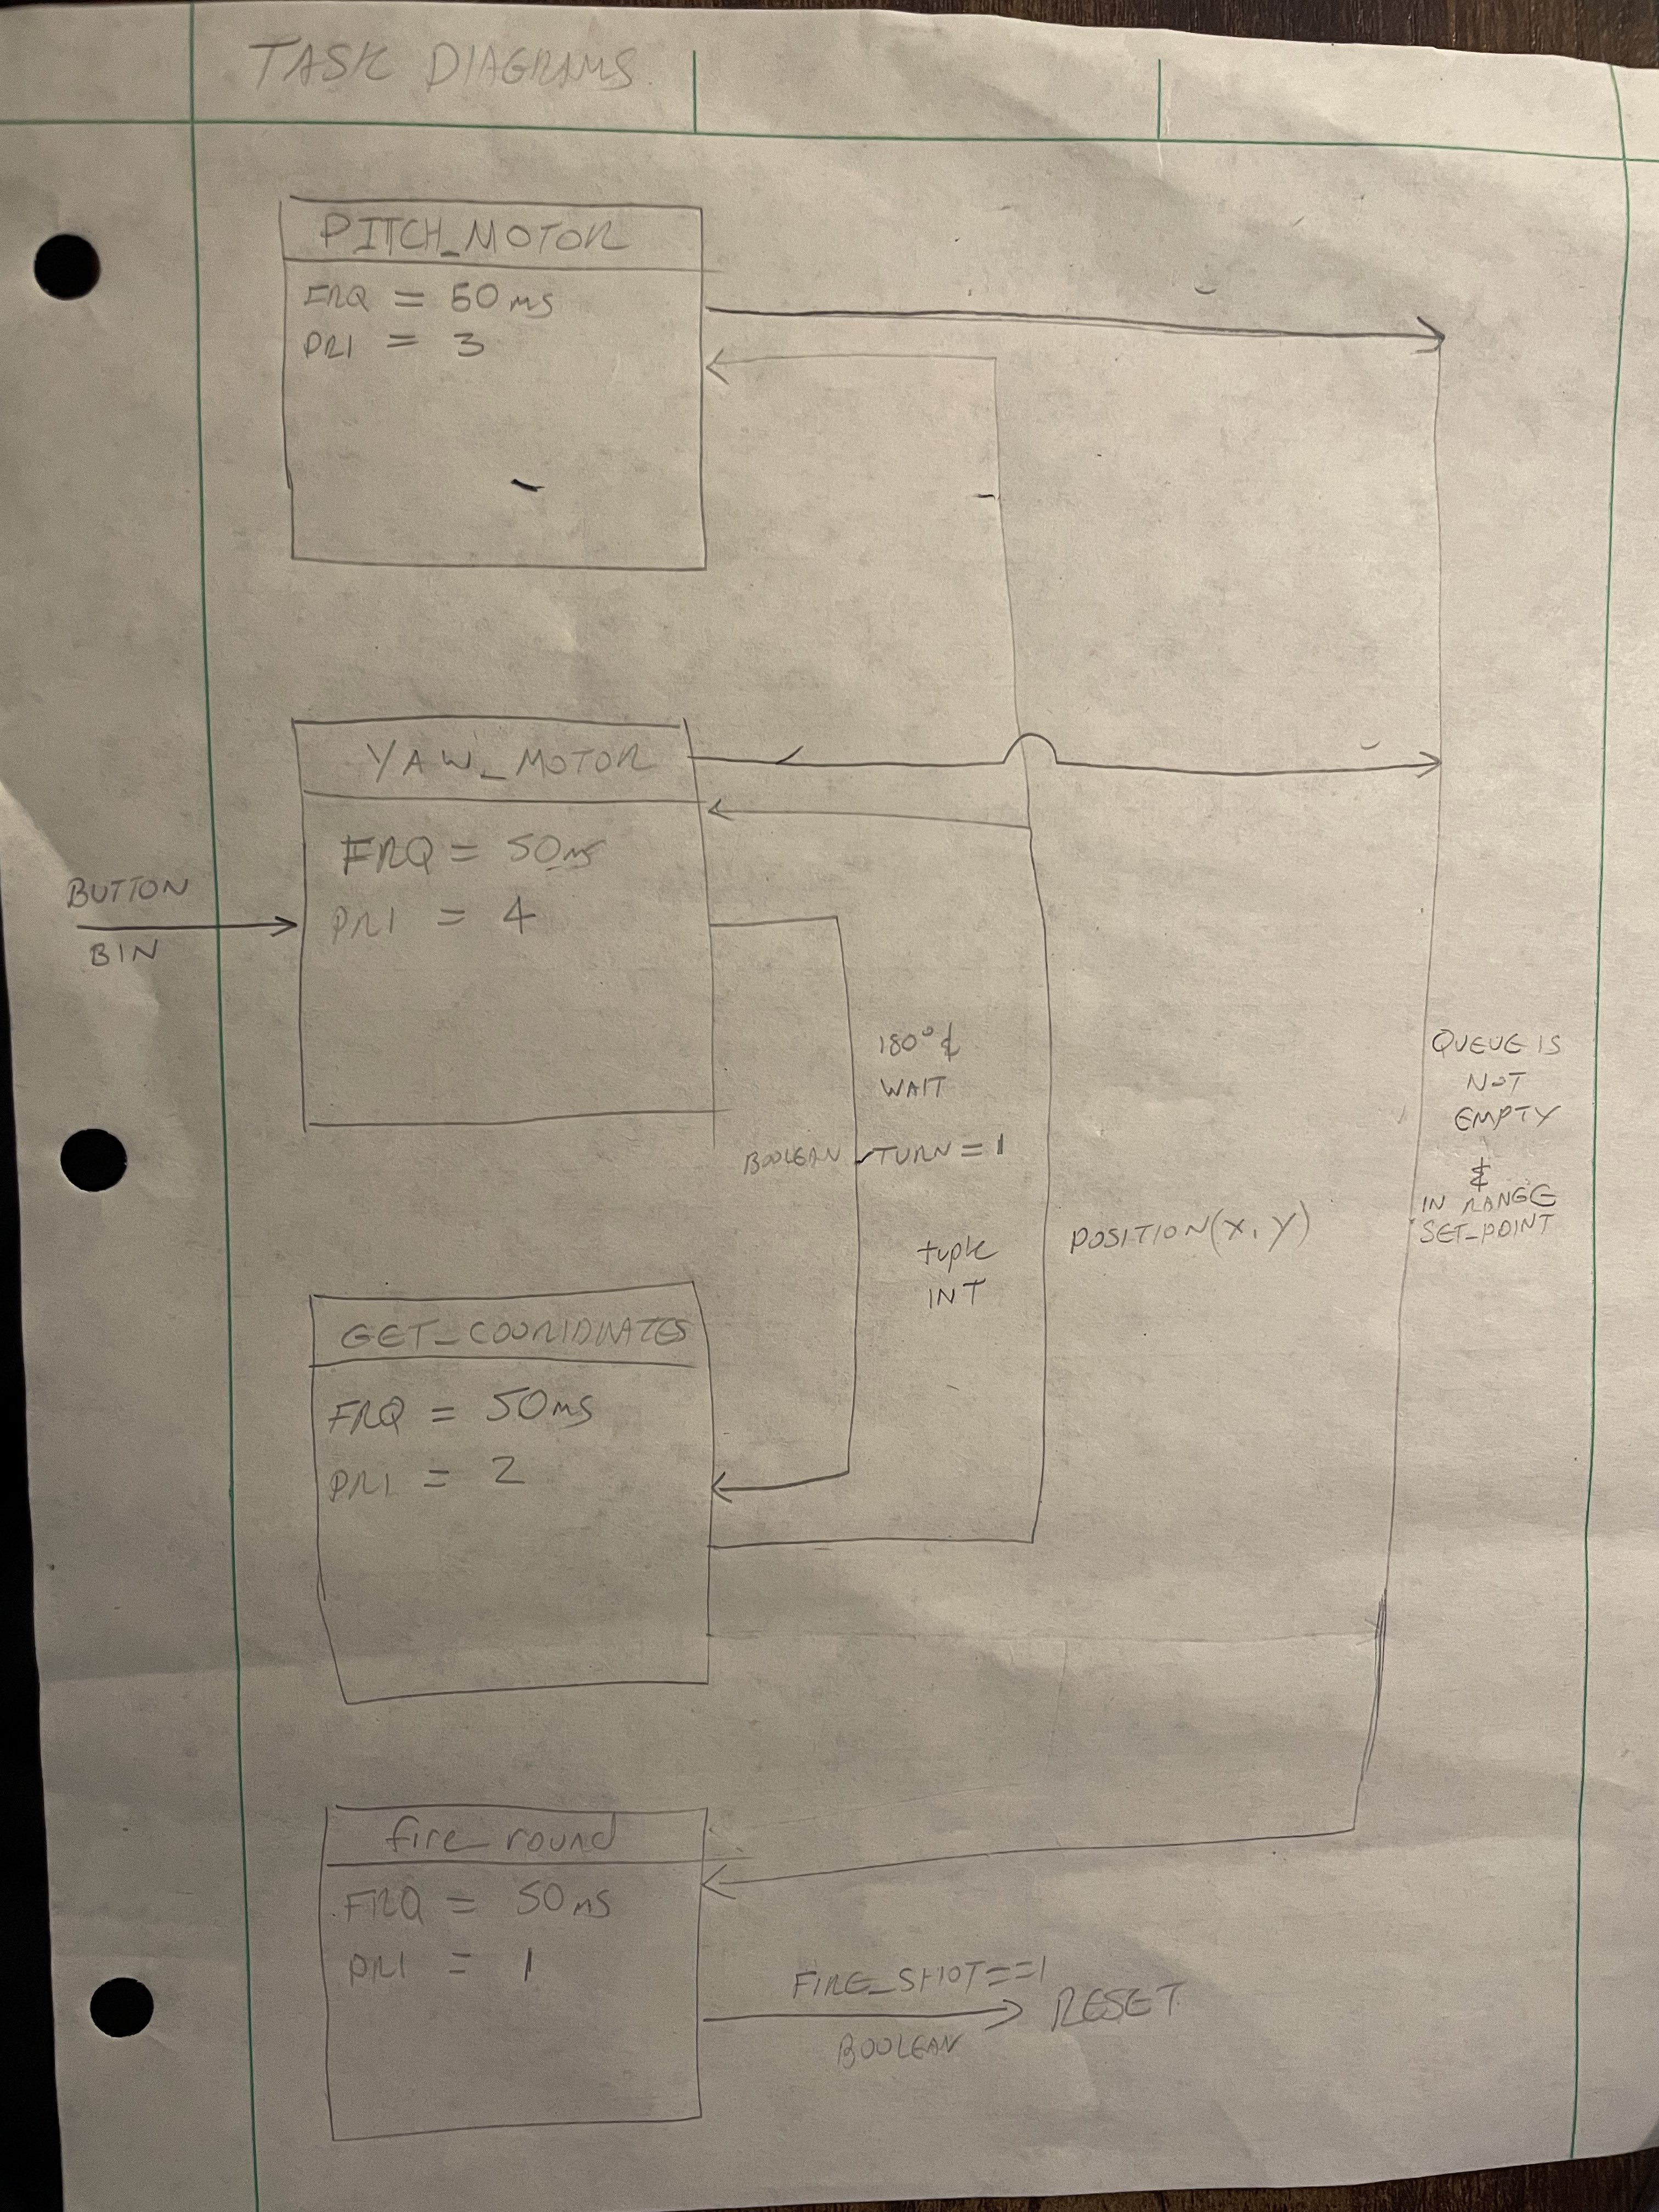
Our software design is based on a cooperative multitasking design around 4 tasks. These tasks are our pitch motor, yaw motor, target acquisition, and firing mechanism.
Our code implements a cooperative multitasking scheduler using the cotask and task_share modules. Tasks are defined as functions, and they yield control back to the scheduler using the yield statement. The scheduler then runs the next task until it yields or completes. Shared data between tasks is managed using shared variables provided by the task_share module. Overall, the code is running several tasks concurrently and using shared variables to communicate between them, allowing for cooperative multitasking.
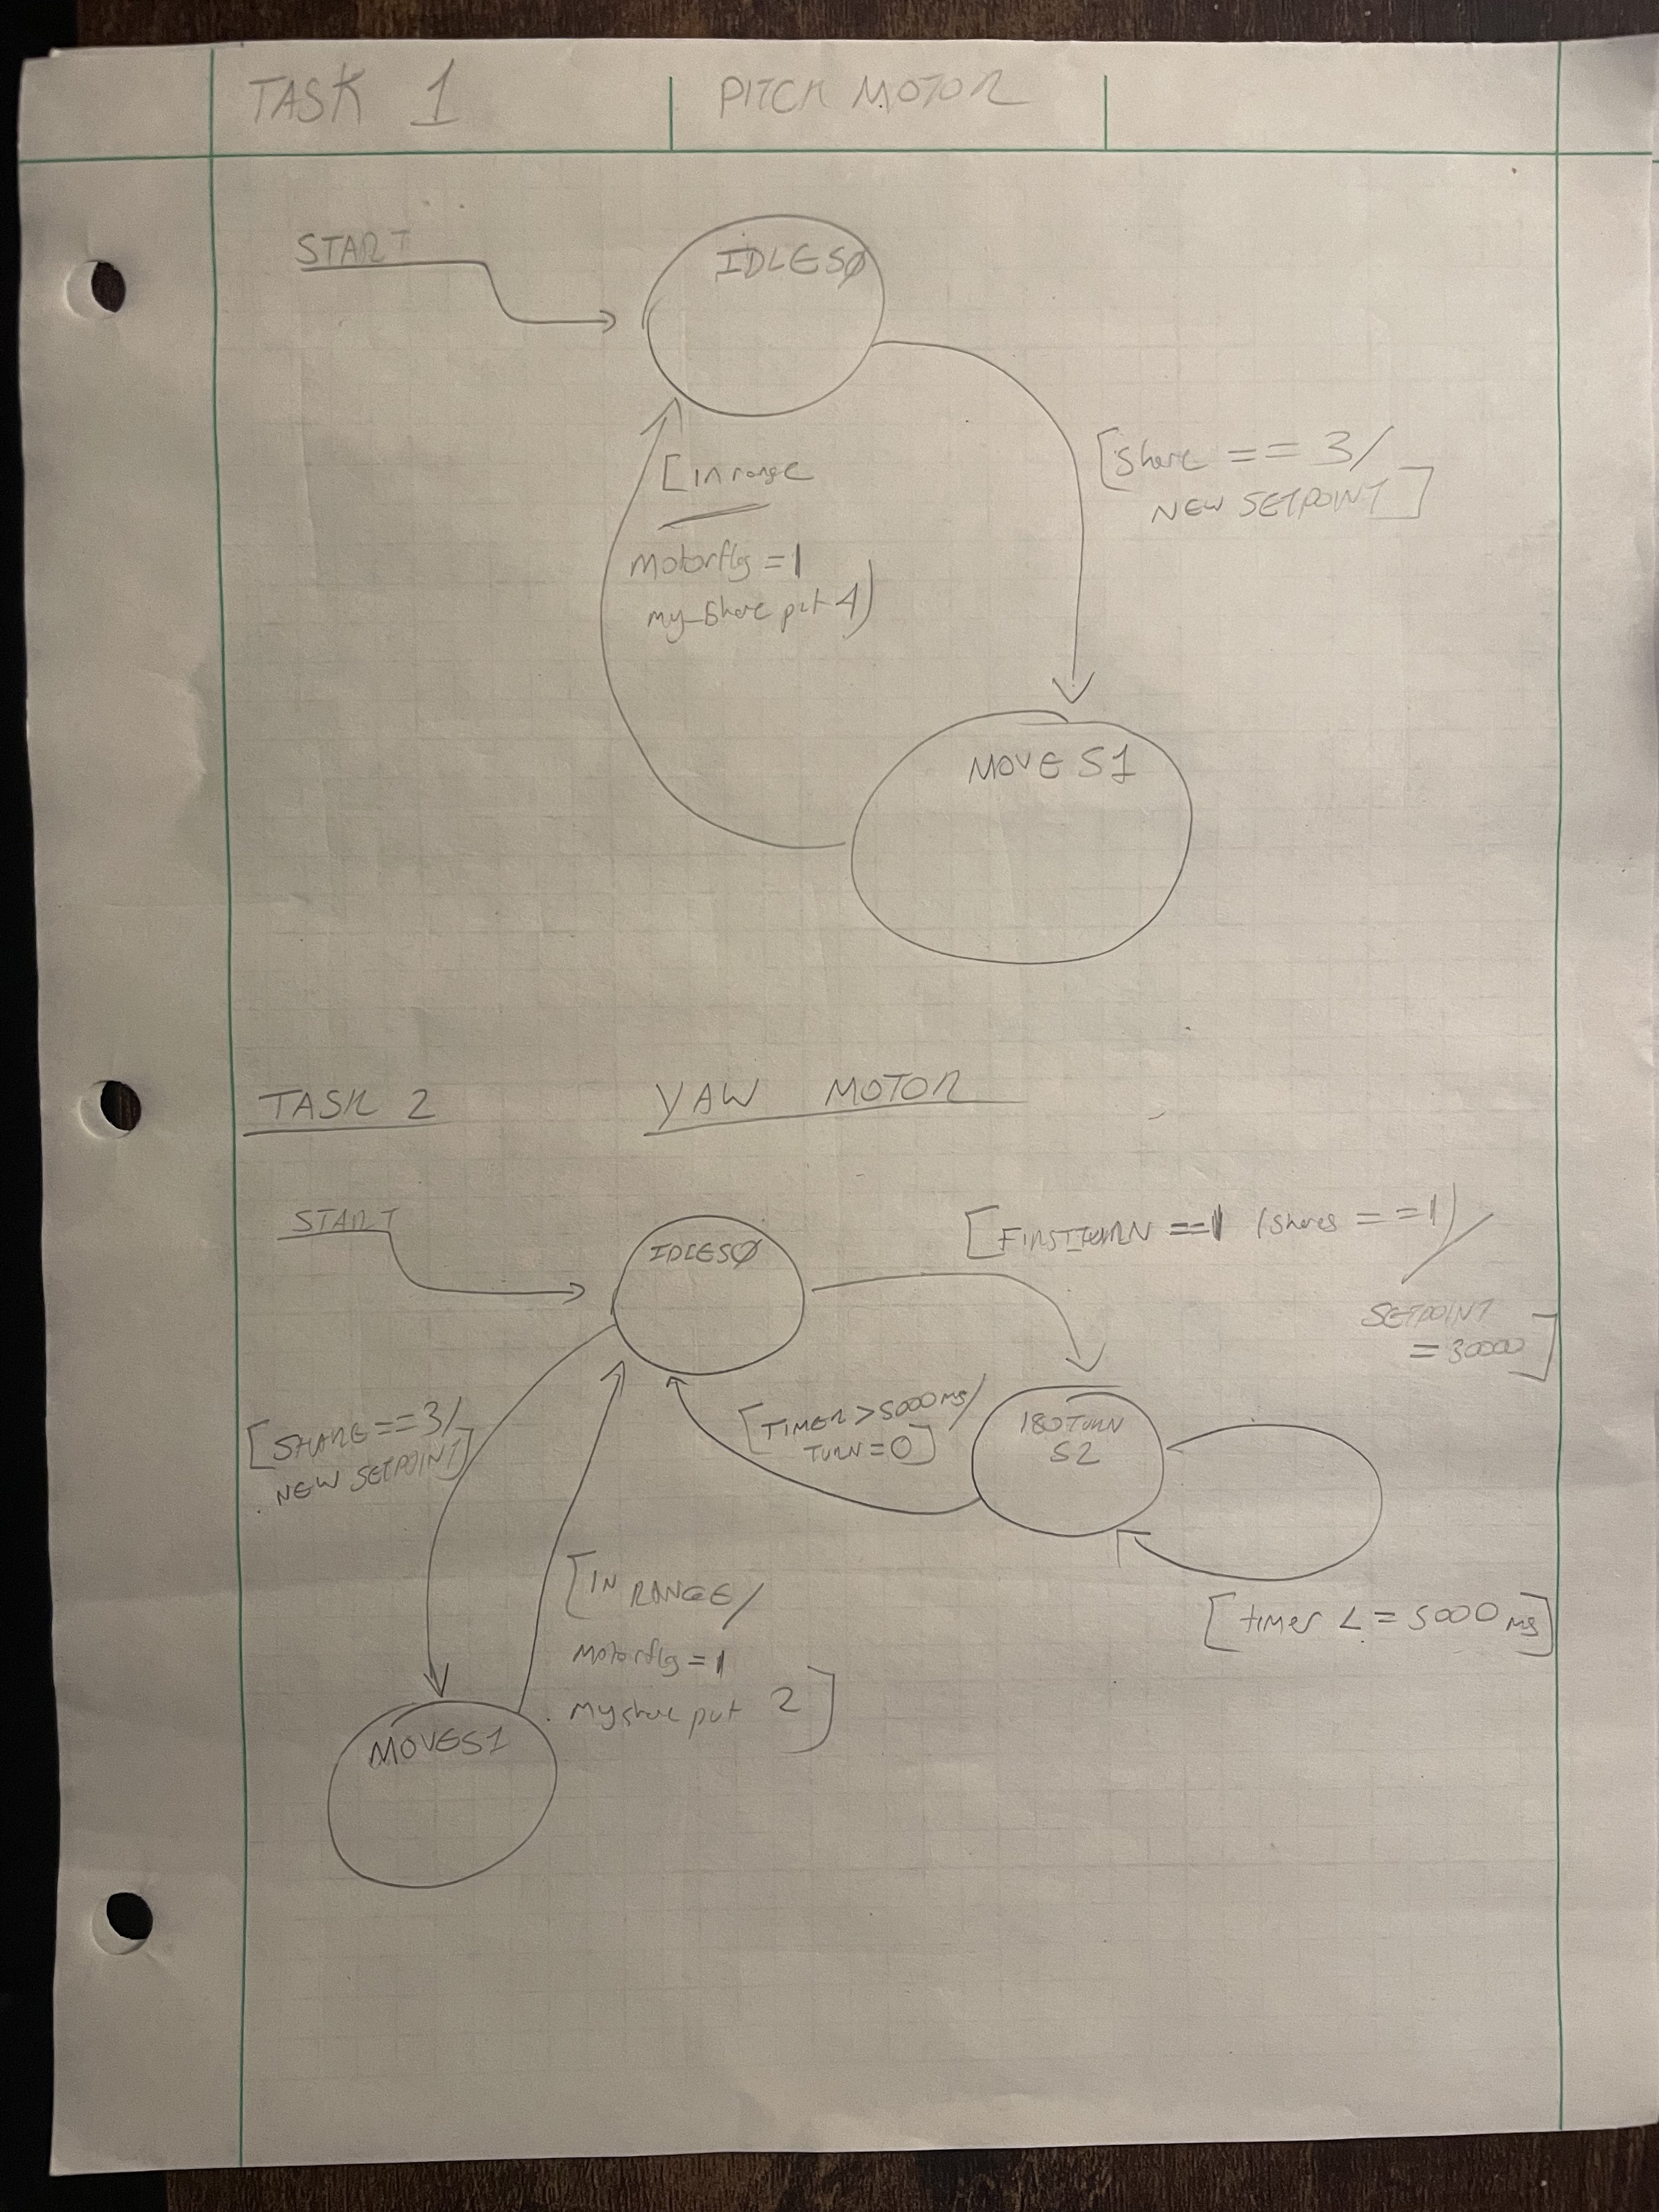
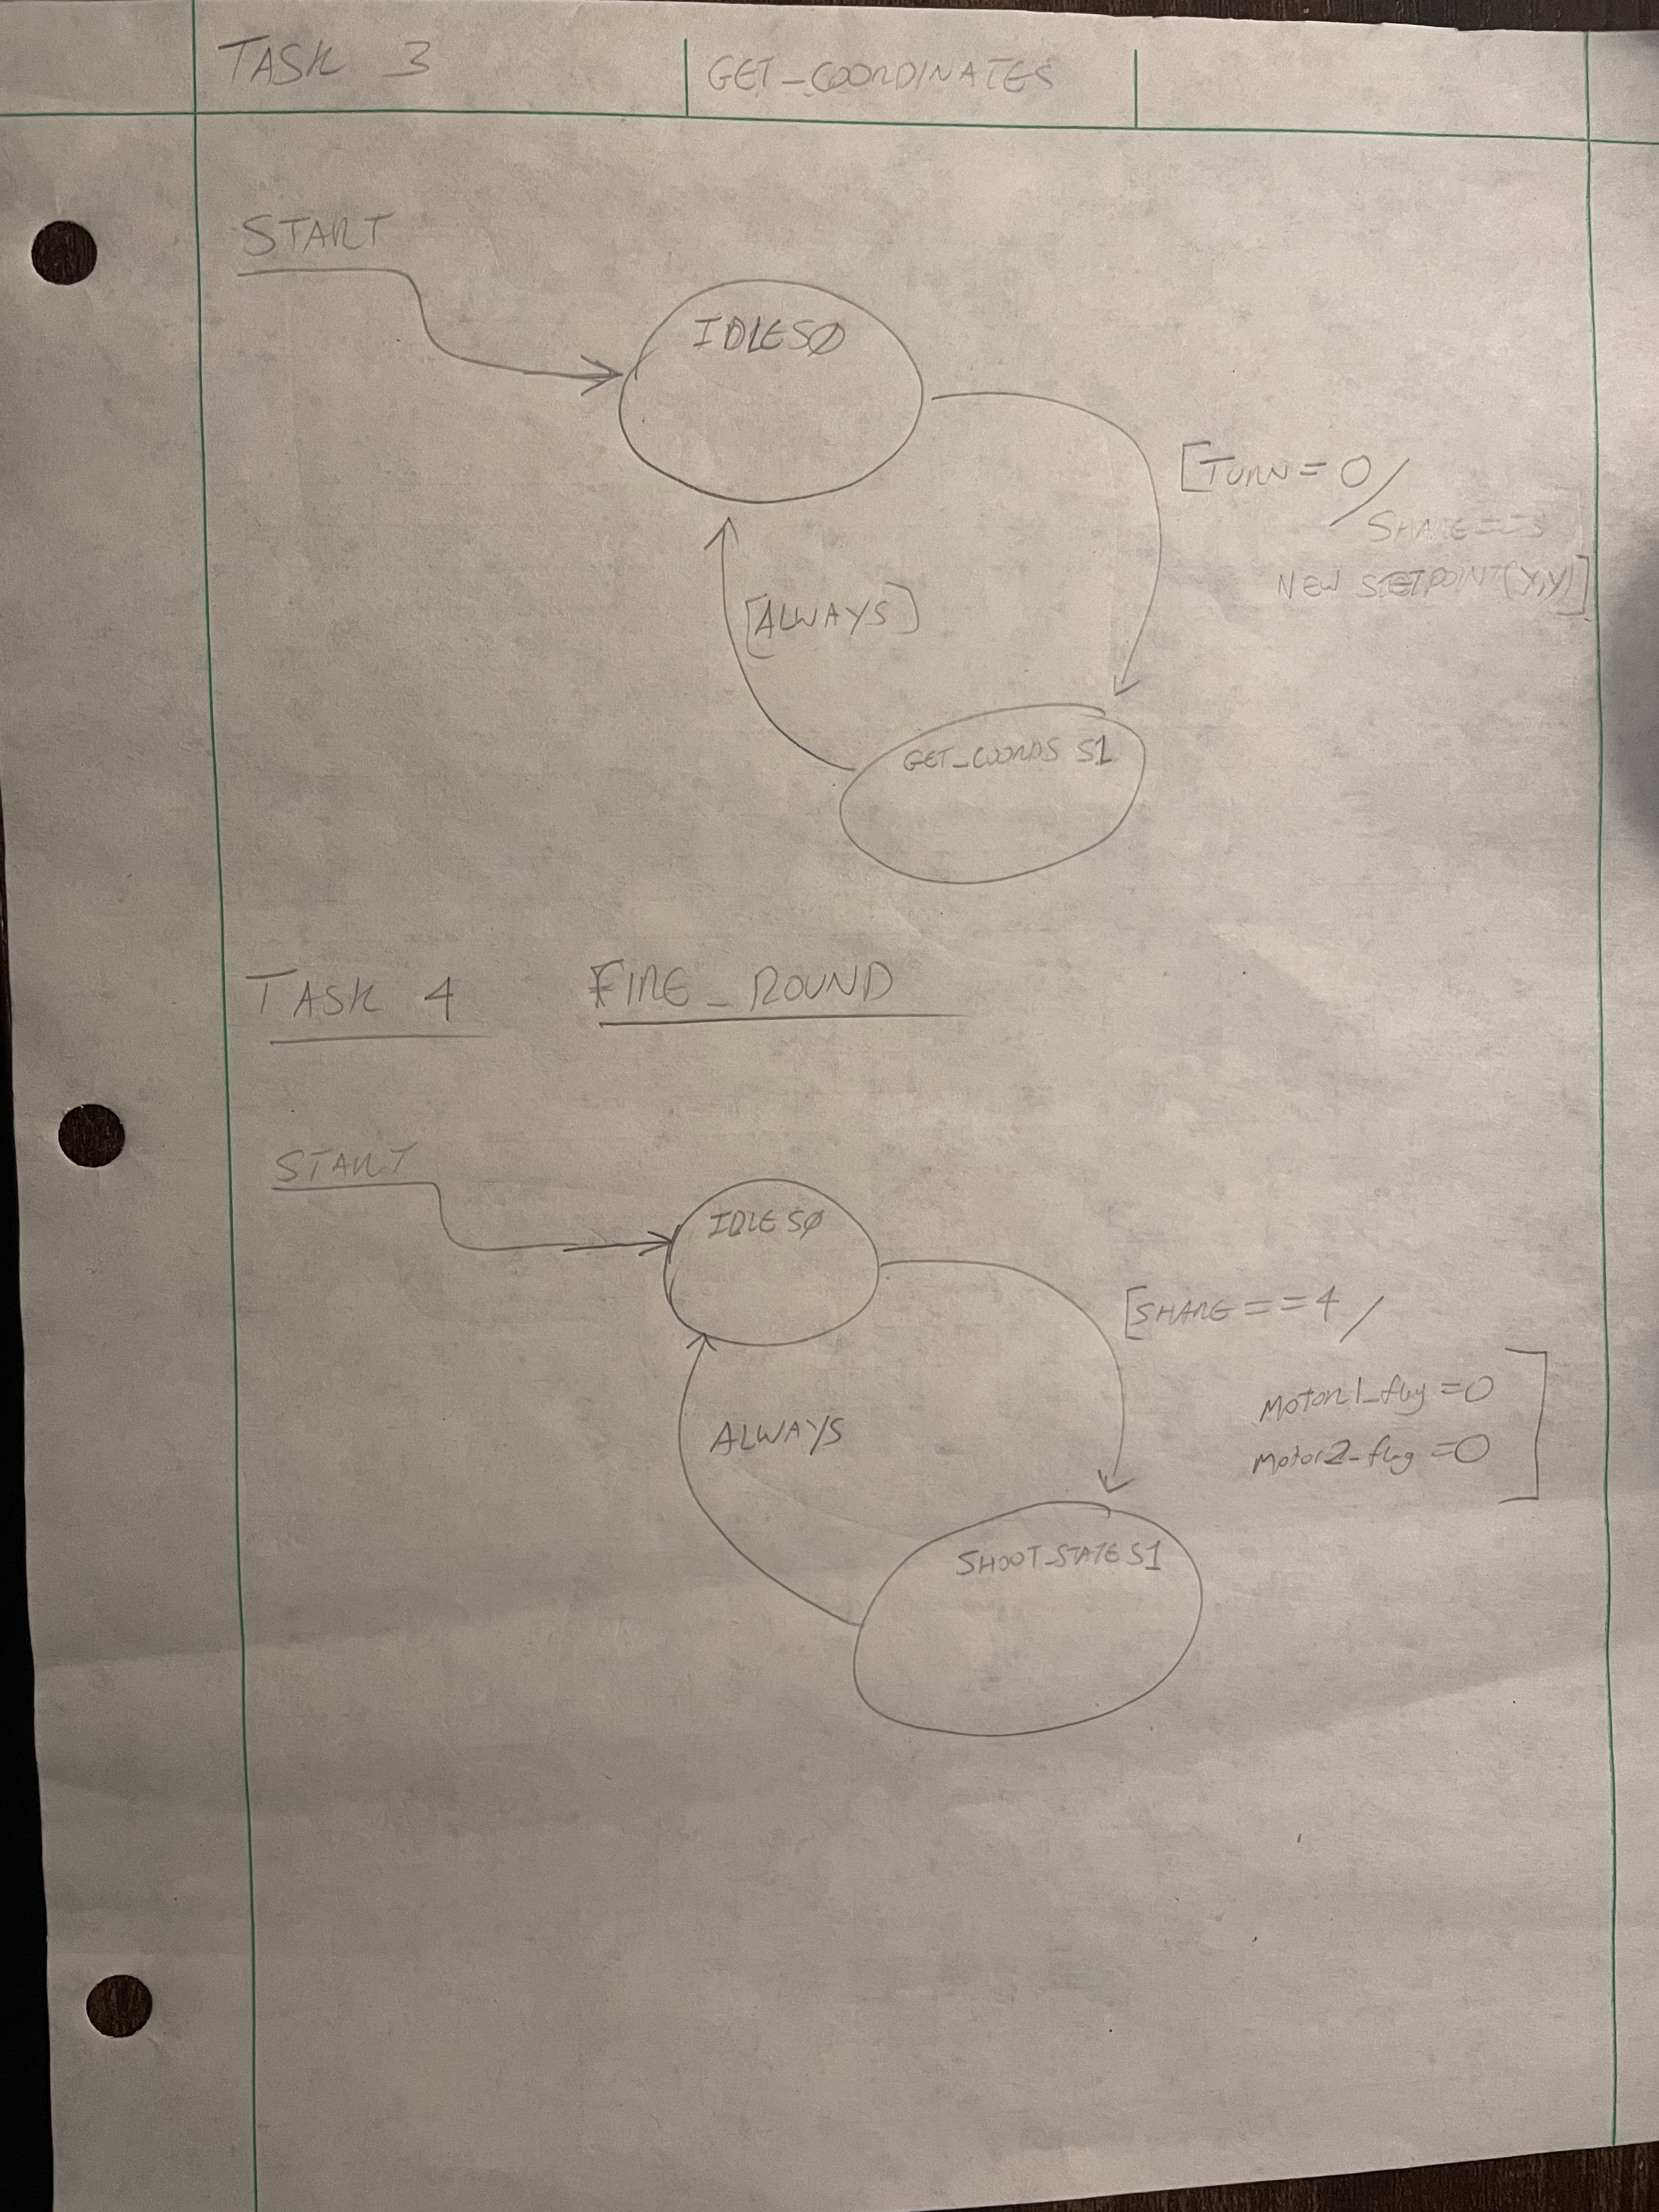
Our main program defines four tasks, two of which control the movement of the pitch and yaw motors. The program begins once the user button on the microcontroller is pressed. The system then begins its first task, which turns the gun around by 180 degrees. The system then waits for 5 seconds and moves to the next task. The next task uses the image produced by the IR camera to obtain the coordinates of the target (hottest pixel). These coordinates are then converted to ticks using simple geometry and other calculations, and are set as the motors' new setpoints. The motors then run until they reach the range of that setpoint. Once both motors are in position, the final task is triggered, which fires the NERF gun.
Our Finite State diagrams and Task diagram are provided both here and in our doxygen. Our software design is provided in great detail on our doxygen gituhub.io page for this project, please refer to the link below for more detailed information: https://rmevorac.github.io/ME-405-term-project/
Task Diagram:
Finite State Diagrams:
Project Outcome
Duel Day Performance
Our turret reach ours sections finals, but in a dissapointing way. Its tracking was excellent and was able to easily follow the target, however a mysterious code gremlin popped into our design sometime during the 3 hous between the end of our all-nighter the night before and our designated dueling time. While we lost no points, we gain none either as we could noot shoot. No amount of good tracking will fix a gun that doesnt shoot. We are unsure why it worked the night before then refused to work during the duel and did attempt to discover why during the friday after the duels. We eventually determined that the issue was a mixture of too much current draw and a strange calibration issue with our on/saftey stop button code. Ultimatley, we where proud of how our gun functioned while it worked and regret it could not operate at is best during the dueling day.
Testing Results
We tested similarly to how we would duel, the onlly difference is that the test subject did not have their own turret at the end of the table. We decided to test like this because we wanted to calibrate the turrets accuracy to the same conditions the duel would take palce in. during the calibration testing the night before, the turret was opperating very effectivley and was landing 5 hits for every 8 shots. We anticiapted a good performance on duel day assuming the turret would function the same.
What We Learned
There was many things learned through this project and should be categorized into Mechanical, Eletrical and Software lessons. The brief summary for anyone attempting this project can be seen below in the Dos and Donts:
Dos:
1.Use an eletrical firing system. Eletrical nerfguns are simply easier to actuate and shoot very effecitlvey. The pre-packaged design makes them easy to integrate into a turret.
2.Supply power through a power supply rather than batteries, we are grateful that it reduced the weight of our gun and during its functional peroid it gave us very consistent firing results.
3.Keep the tracking algorithim simple, we observed many people doing complex manipulation of the thermal array and have reduced accruacy than ours, just reading from the array keeps the processing light and provides highly reliable tracking.
4.Consider non-backdrivable systems. While the high gear ratio lsows down your turning, we removed alot of backlash in our axis that had our worm-spline gear system
5.We added a physical hardstop on our guns base to help us zero the gun for every duel.
Donts:
- Do not rely on only 3D pritned components due to the fragility of them as tensile load bearing structures. Consider including wooden or metal components for this such as shafts.
- Ensure that any custom eletric circuit system is as compatible as possible with the electronics within your NERF Gun as a lack of compatibility will cause misfires.
- Conduct thorough tests to ensure new code does not inhibit core functions and prioritize that rather than calibration testing.
Mechanical Lessons
Most of our hardships where due to the heavy use of 3D printed parts. We originally designed our system to have pulleys fixed onto 3D printed shafts, however we soon realized why thats a problem. All our parts where experencing stress perpendicular to the plane of printing which caused layer seperation and broke our shafts and bearing mounts off. This was remedied in two ways. The layer seperation on our bearing mounts was fixed with the help of Thomas Taylor who advised on a printing strategy that would change the direction of the print layer and increase strucutral rigidity through brass inserts. We are very grateful for his assistance concerning this part and his advice has helped all of us become more competent designers for 3D printing. For the shafts, thier snapping was remedied differently depending on the axis. For the yaw shaft, a generous amount of plastic bonder cement was applied with the snapped shaft and pulley to the original base. For the pitch shaft, the system was replaced with the worm gear-spline gear winch mechanism which opperated with much less backlash than the original pulley system. Overall the lesson here is do not trust 3D printing on its own for structural applications, it should be combined with additional components and be put in compression rather than tensile loads.
Eletrical Lessons
The eletrical side of our turret seemed to work fine up until our last moments, wherein we suspect it to possibly be part of our firing issue. The turret's firing mechanism is a simple circuit with the two firing wires sending a shoot signal when shorted. To protect the STM output pins, we implemented a BJT-transistor switch which was used to open and close the connection. This was the extent of the circuit we had, which leads us to believe that we possibly needed to investigate our eletrical circuit much more thoroughly to ensure we would not have misfires as one of our members believes that current leakage may of been our issue or that our microcontroller could not provide enough current because the gate capacitance was too large.
Software Lessons
Our software side learning was the most mild as all the previous tools such as our motor controller and camera components where easy to implement. We decided to go with a simple but effective scanning method with our camera wherein we simply checked every cell and its neighbors. The cell with the highest combined value of itself and its neighbors had its row and column stored and we did that for the entire thermal camera array. This system provided us good tracking results after some calibration. Our biggest coding hump was trying to implement a system that allowed us to use the blue user button on the microcontroller to start and stop the turret. We first where having issues with our ExtInt system throwing errors which was due to improper naming conventions within our code and then had trouble implmenting it into our code. We ended up putting each of our tasks in a while loop that depended on the button's boolean being set in order to function, this gave use essentially a pause button functionality on our turret.
Original Description and additional files
We are intending to make a 2 axis turret equipped with an electronic nerf launcher. The goal is to use a medium sized motor likely one of the tub motors for horizontal panning and either a more powerful motor we purchased online or a dual tub motor gearbox. We are likely going to 3D print most of the superstructural pieces and manufacture components like the trigger mechanism. The goal is to get the gun to land the first shot. We are confident on our electric gun choice but unsure on the motor selection.
Motors: Pitch Motor : Tub motor Yaw Motor: 1 – 2 Tub motors
Drive System: Pitch: Likely a single gear step (not including gearbox on motors) in the range of 2:1 to 4:1 Yaw: Also a single gear step in the range of 2:1 to 5:1 or utilize a two motor gearbox
Nerf Gun: Vendor: Amazon Model: Nerf Ultra Select https://www.amazon.com/NERF-F0958-NER-Ultra-Select/dp/B08SYD2685?source=ps-sl-shoppingads-lpcontext&ref_=fplfs&psc=1&smid=ATVPDKIKX0DER
Data sheet for Nerf Gun: https://icecat.biz/p/nerf/f0958u50/ultra-toy+weapons-5010993855285-select-89523906.html
Data sheet for Adafruit MLX90640 IR Thermal Camera: https://learn.adafruit.com/adafruit-mlx90640-ir-thermal-camera/downloads
Trigger System: Electronic Trigger System
Total Cost: Nerf Ultra Select Gun - $51
Task Diagram:

FSM:
